Does Solar in Leeds Affect my Roof's Drainage?
Installing solar panels on your Leeds home is a smart move for cutting bills and boosting property value. But here's something many homeowners miss: how panels interact with your roof's drainage system. Get the placement wrong, and you're looking at blocked gutters, water backup, and potential leaks. The good news? With thoughtful planning, your solar array and drainage work in harmony without compromise.
Quick take: Poor panel placement can block gutters, valleys, and downpipes, causing water damage. Protect your Leeds home by maintaining clearance around drainage channels, elevating mounting systems, sealing all penetrations, and keeping gutters clear. This guide walks through planning checks, placement principles, and upkeep routines that keep your roof dry whilst your panels generate clean energy.
Table of Contents
Why Roof Drainage Matters for Solar Panel Installations
Where Solar Arrays Create Drainage Problems
Essential Pre-Installation Drainage Assessment
Placement Guidelines That Protect Water Flow
Installation Methods That Keep Drainage Clear
Keeping Your System Drainage-Friendly Long-Term
Why Roof Drainage Matters for Solar Panel Installations
Your roof's drainage system includes gutters, downpipes, valleys, and outlets that channel rainwater safely away from your property. These elements protect your home's structure and foundation by preventing water accumulation. When water can't escape properly, it adds weight, seeps through gaps, and causes deterioration. Installing solar panels means adding hardware that mustn't interfere with this critical flow. Industry experts confirm that drainage systems exist to move water off roofs and protect building integrity, making any obstruction a serious concern.
Solar modules and their mounting framework can disrupt how water runs off your roof. Buildings are designed to shed water efficiently to gutters and drains, but panels, frames, and electrical conduits alter these patterns. Installation best practice demands that arrays don't block drainage paths. This means positioning panels with enough space for rainwater to flow freely and elevating hardware so water doesn't collect underneath.
For Leeds properties, this consideration carries extra weight. Our city's regular rainfall puts drainage systems to the test year-round. Victorian terraces across Headingley and Chapel Allerton often feature complex roof layouts with multiple valleys and aging guttering. Traditional back-to-back houses in areas like Harehills present unique drainage challenges due to their shared roof structures. When drainage gets compromised, Leeds weather won't give you long before problems show up.

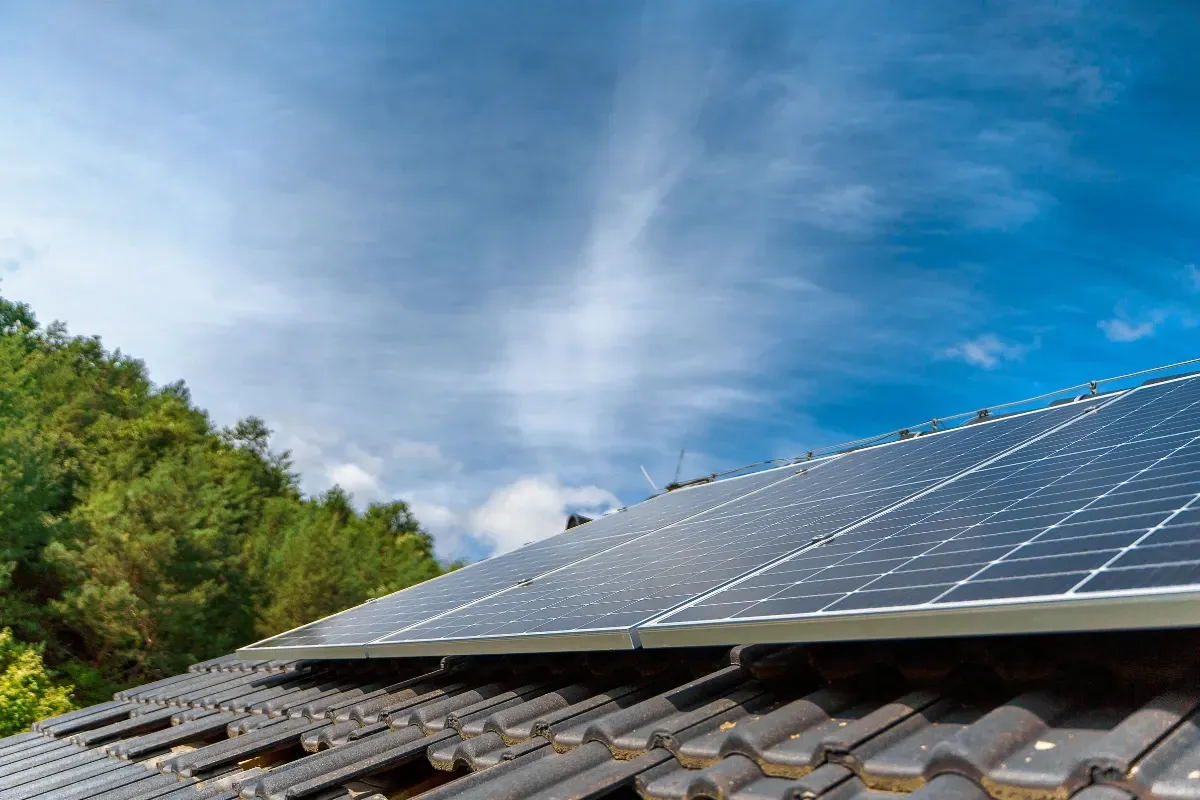
Where Solar Arrays Create Drainage Problems
Several installation mistakes repeatedly cause drainage issues. The worst culprits involve panels or mounting rails positioned too close to edges, valleys, or gutter lines. Roof valleys are engineered to funnel water efficiently, but when panels sit across or near a valley, they create potential leak points. Electrical cables running over flow paths trap leaves and debris, stopping water reaching downpipes. Even minor obstructions near gutters collect sediment washed from roof tiles, gradually building blockages. Research shows any barrier beneath or around the array disrupts natural drainage and risks water ingress.
Maintain buffer zones around water channels. Position panels at least two feet back from valleys, downpipes, gutters, or drainage outlets. This separation ensures mounting hardware doesn't sit directly over critical flow routes.
Raise mounting systems above the roof surface. Use standoffs or elevated rails so rainwater passes beneath your panels. Proper clearance stops pooling, which matters particularly for the lower-pitch roofs common on Leeds properties in Roundhay and Armley.
Watch roof edges carefully. Panels or flashing positioned near eaves can direct water beyond gutters or cause splashing. Inadequate sealing at edges and valleys provides direct routes for water penetration. Maintain adequate setback or install protective flashing.
Prevent debris accumulation. Cables, wire trays, or protective screens under panels act like barriers. When leaves and dirt collect beneath your array, water flow stops. Keep installations elevated enough that debris naturally washes clear.
Essential Pre-Installation Drainage Assessment
Before any panel goes up, your existing drainage needs thorough inspection and repair. Gutters and downpipes must be clear, watertight, and sloped correctly. A proper check covers blockages, correct fall, and secure mounting. Clear any clogs or fix loose sections first, because backed-up water will overflow once panels limit access. Check all valleys and flashing thoroughly, removing debris and repairing corroded or loose metalwork. Blocked valleys trap rainfall, letting it penetrate beneath tiles or panels.
For low-slope or flat sections (common on Leeds extensions and commercial buildings), confirm that drains, scuppers, or overflow points aren't blocked.
Gutter and downpipe inspection: Remove all debris from gutters and downspouts. Fix sagging sections to maintain proper drainage slope. This becomes critical in leafy areas like Meanwood or Horsforth.
Valley and flashing checks: Examine valleys and flashing for blockages or damage. Small obstructions redirect water under roof coverings. If your Leeds home has traditional slate or stone tiles, pay particular attention here.
Flat section drainage: Verify each drain, scupper, or outlet is clear and properly sized. Panels shouldn't cover drainage points. Where necessary, installers plan additional downspout positions or "crickets" to guide flow.
These checks prevent nasty surprises later. Confirm gutters, downpipes, and outlets will function properly once your solar installation is complete.
Placement Guidelines That Protect Water Flow
Array layout should follow clearances that preserve drainage. Keep open zones around gutters, downpipes, and drains. Industry standards recommend at least two feet of clearance between mounting hardware and critical drainage areas like valleys, scuppers, and gutters. This buffer stops hardware sitting over water pathways. Rails and conduit should be angled or shimmed so water drains beneath your array. Installers use spacers or crickets at the upslope end to direct rain toward gutters.
Edge margins matter: Don't mount panels flush to gutters or eaves. Stay back at least two feet from gutter lines or valleys. Fire access requirements often call for 3-foot clearways at edges, which also helps drainage.
Elevate above the deck: Raise frames and conduit on blocking so water runs freely under panels. Even slight clearance prevents pooling during Leeds' frequent drizzle.
Add crickets where needed: Where arrays cross seams or sit on large flat areas, install crickets behind panel rails to divide flow and stop water collecting.
Route wiring thoughtfully: Don't run cable trays along gutter lips or down valleys. Keep electrical runs within the array zone, secured so they won't catch debris.
Design your system so every raindrop has a clear path off your roof. Building regulations often explicitly require that arrays don't impede drainage. Meeting these standards sometimes means adjusting panel layout slightly to put water flow first.
Installation Methods That Keep Drainage Clear
Proper mounting and cable management prevent hidden drainage problems. All penetrations (flashings, fasteners, conduit entry points) need complete sealing to stop leaks. Use quality flashing kits and sealant around each attachment. Where possible, minimise penetrations by using non-penetrating mounts or properly flashed anchor systems. During installation, clean up roof grit or drilling debris to prevent it washing into gutters.
Cabling needs careful planning. PV cables should be fixed in trays or clips attached to racking, never left loose. Unsecured wiring snags leaves and acts like a dam beneath your array. If pest guards or mesh are fitted, make sure they don't become debris collectors. Some installers raise arrays higher where trees are nearby, letting twigs and needles wash through.
Elevated mounting rails: Install panel racks several inches above the surface. This allows rainwater and small debris to clear underneath. For typical Leeds installations, this spacing isn't optional.
Quality flashing and sealing: Apply durable waterproofing at every bolt or bracket penetration. Installers should clean all debris so it doesn't get swept into gutters.
Cable management systems: Bundle and secure cables to rails, keeping them away from gutters. Avoid long horizontal trays at array edges. Choose clip systems that route cables along module frames.
Combining elevated mounting with careful cable management ensures neither hardware nor wiring traps water or debris. A well-installed system sheds water more effectively than an unprepared roof, which Leeds properties need during wetter months.
Keeping Your System Drainage-Friendly Long-Term
Regular maintenance protects both your roof and your investment. Debris collecting under or around panels eventually clogs gutters or downpipes, so inspect after storms and at least twice yearly. Seasonal maintenance means cleaning gutters and downspouts in spring and autumn, when leaf accumulation peaks. With panels overhead, debris sometimes lands in awkward spots, so fitting gutter guards before or after solar makes sense. Skipping routine cleaning shortens the life of your roof and array.
Solar panels typically stay clean when tilted, as rain washes off dust and pollen. But monitor panel output regularly. If you notice drops in energy production without technical explanation, your array might need washing. Gentle hosing or using a blower removes settled debris. In particularly dusty or leafy locations (tree-lined streets in Kirkstall or Bramley), you might wash panels once or twice annually. Also inspect all flashings and sealants yearly. Any loose fixings or cracked seals need prompt repair, as hidden water can cause rot or hard-to-spot leaks.
Gutter maintenance: At least twice yearly, clear leaves and dirt from gutters and downpipes. Check around panel mounting and behind arrays for hidden blockages. If you're uncomfortable working at height, professional maintenance and repair services handle this safely.
Panel cleaning: If panels look dirty or output drops, spray them with a garden hose or soft brush. Avoid harsh cleaners. Tilted panels generally shed water better.
Mount inspections: After severe weather and on a regular schedule, check rack mounts, flashings, and roof membrane around your array. Look for debris accumulation or ponding and clear it.
In short, continue your normal roof maintenance routine but give extra attention to areas under and around your solar array. A little upkeep prevents panels becoming a problem and keeps your Leeds home protected.
Leading the Way With Proper Solar Installation
Protecting roof drainage isn't optional when installing solar. If water pathways get blocked, you're facing anything from minor deterioration to major structural damage. Your PV system should never compromise roof drainage. Following the approaches above (careful placement, elevated mounting, sealed penetrations, and regular cleaning) lets your array coexist perfectly with your roof's water management. Building regulations now often explicitly require that solar installations don't obstruct drainage, making this a legal requirement alongside best practice.
Treat your solar installation as an integrated part of your roof. Design it so rain still has clear routes to gutters. Do that, and your panels generate clean energy without causing water problems. Whether you've got a Victorian terrace or a modern semi, Leeds roofs need to handle our rainfall effectively. When you combine quality solar installation with proper drainage planning, you're protecting your investment and your home.
If you're considering solar for your Leeds property and want installation done right, get in touch with our team. We'll assess your roof, work around your drainage system, and deliver a system that performs for decades without compromising weather protection. After all, we're Leeds based, and we know what local roofs need to handle.

Roof Drainage and Solar Panel FAQs
How do solar panels affect roof drainage?
Panels and mounting rails can cover or narrow water channels. If hardware sits over a valley or above a gutter, water backs up under tiles. Cables laid across downspout routes trap leaves and block flow. Anything placed over designed drainage acts like a dam. Experts warn such obstructions hinder drainage and cause leaks, so panels must stay clear of gutters, valleys, and drains.
What roof checks are needed before installing solar?
Inspect gutters, downpipes, valleys, and roof outlets. Confirm gutters are clean and securely fixed, and valleys and flashings are debris-free. Check that flat-roof drains or scuppers aren't blocked. Also assess roof condition (age, material) and verify it'll support panels. Make sure your current drainage works properly, and identify how your planned array might affect water flow.
How much space should panels leave around gutters and edges?
Standard practice leaves 6-12 inches from gutter lips so rain can still enter. For critical drainage like valleys or internal drains, guidelines recommend staying at least two feet back. For fire access and roof egress, many areas require 3-foot wide clear zones at edges and hatches. Don't cover or overshoot gutters, and position panel edges well clear of roof drains.
Should I fit gutter guards when installing solar?
It's wise, especially if you've got nearby trees. Solar panels can make gutter access trickier, so adding leaf guards simplifies upkeep. Fitting gutter protection greatly reduces cleaning problems when adding solar. Guards stop typical leaf buildup that might otherwise collect just out of reach beneath your panels.
How often should I clean gutters and check drainage after fitting panels?
Follow a regular schedule, at least twice yearly (spring and autumn). Clean gutters and downspouts after storm seasons and after major leaf-fall. Also check under your panels periodically. If you spot debris or standing water, clear it out. Monitor panel performance too. A drop in output (with no shading changes) can signal panels or roof surfaces getting dirty and needing a wash. Regular checks keep rain flowing freely, protecting both your roof and your solar battery storage investment.
